Watch this how-to video if you are having issues with controlling temperature or you are seeing unrealistic readings.
Troubleshooting Temperature Control Issues
Accel-RF test systems and fixtures provide precise control for reliability testing and performance degradation studies over a wide range of temperatures.
If you are having issues controlling temperature where the DUT is not heating up at all or you are seeing unrealistic readings, there are a few quick checks you can perform to try to determine why.
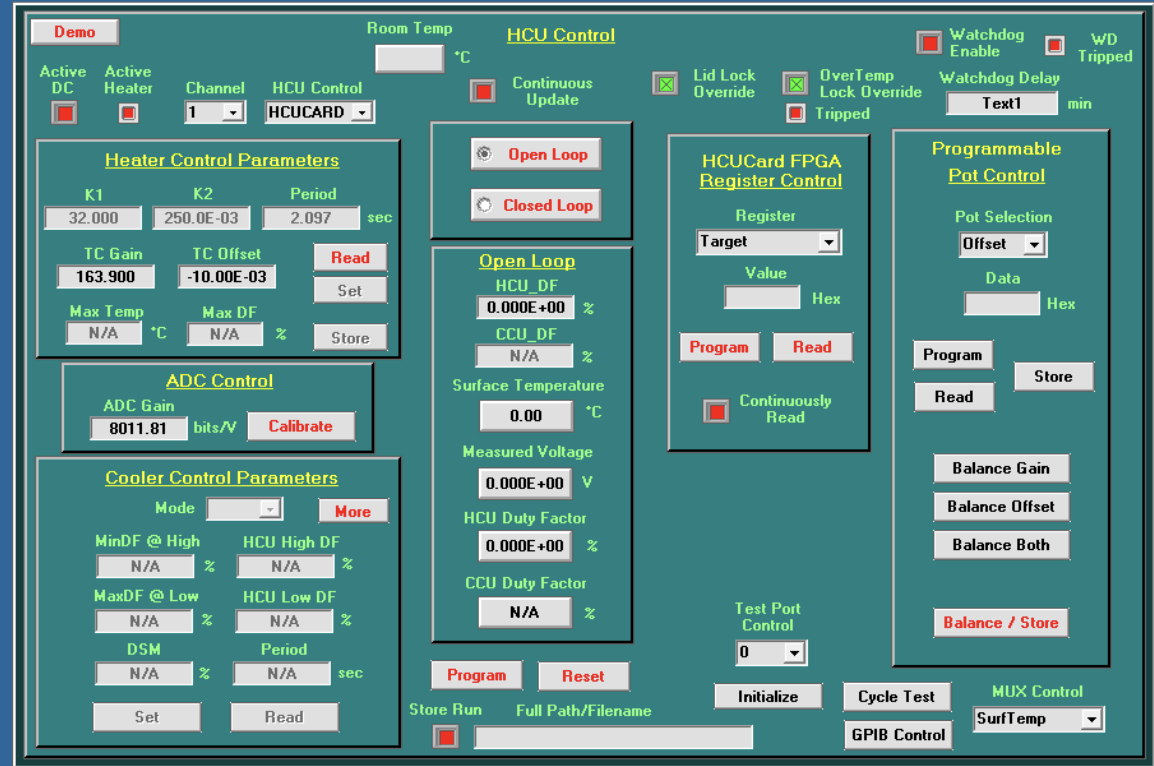
The best place to start is in the HCU Control form in the LifeTest software, which is accessible from the main menu. If you have a test running on other channels not under investigation, this menu item will be disabled. Press CTRL+F2 to enable access.
Once in HCU Control, select the channel of interest. Along the top of the screen are a few useful indicators.

In the top right are the settings for the Watchdog timer for the Heater Control. The Watchdog is a failsafe that will turn off the heaters if the software ever loses contact with the hardware for longer than the entered delay time. This is typically between 15 and 20 minutes.
The Watchdog Tripped indicator should nominally be red, indicating no trips.
The delay should be at least 15 minutes and if either of these is not true, it is possible that the Watchdog needs to be reset to allow the heater to turn on.
The next place to look is at the “OverTemp Lock Override” trip indicator. Each heater block in the system is equipped with a failsafe thermostat that will shut off the heater if the block ever exceeds the rated temperature. A trip here would indicate a potential overtemp situation that needs to be cleared in order to use the heater again. If this is the case, now would be a good time to send your system and test info to Accel-RF for review to ensure the situation is not repeated.
The next indicator to check is the “Lid Lock Override”. If this feature is disabled and the box is red, that means the fixture lid must be in place for the heater to turn on. If your fixture lid is removed or not tightened down sufficiently, that could be disabling the heater.
The previous steps would come in handy if your heater is not turning on at all. If your heater will turn on but when it does, you are getting errant temperature values, the next place to check is the temperature calibration factors for this channel.
Click “Read” in the Heater Control Parameters box and take a look at the TC Gain and TC Offset values. If those values were entered incorrectly during a temperature calibration, that could potentially cause the measurements to be inaccurate.
The best way to check to see if you have appropriate cal factors is to compare these numbers to a good, working channel. Select another channel from the pull-down and click “Read” in the Heater Control Parameters box again. Compare the TC Gain and TC Offset values from this channel to the channel under investigation. If they are significantly different, that could point to bad cal factors.
The final step you can take is to compare the software’s measured temperature values to an external thermometer. Turn on the heater to a nominal surface temperature value. This can be done in Edit Levels, for example.
Measurement of heater block using external temperature probe
Once the temperature reaches the goal and stabilizes, measure the heater block using an external thermometer with a probe. See how it compares to the temperature measured by the software.
Temperature measurement using external yellow thermocouple
If you are using a SMART Fixture, you can also take advantage of the extra thermocouple attached to the heater block that runs to the yellow connector on the sidewall. You will need a mating Type K plug running to your thermometer.
If you experience another failure, the problem is most likely a hardware issue and you will need to proceed to the troubleshooting hardware videos or if you still need assistance, please SUBMIT A SUPPORT TICKET
